
If you’ve ever wanted to make your own pure, homemade juice, jams, or jellies, you might have come across a handy tool called a steam juicer. But how does a steam juicer work, and why might it be a better option than electric juicers or manual squeezing?
In this post, we’ll explain everything you need to know about steam juicers—what they are, how they function, and why they’re ideal for home canning and juice making.
What Is a Steam Juicer?
Before knowing how a steam juicer works, it is essential to know what it is.
A steam juicer is a stovetop kitchen tool used to extract juice from fruits and vegetables using steam heat. Unlike centrifugal or masticating juicers that crush or grind raw produce, steam juicers cook the fruit with steam, causing the juice to separate naturally.
This method is especially popular among gardeners, homesteaders, and jam makers who want to make large batches of juice for canning or preserving.
Why Use a Steam Juicer Over Other Juicing Methods?
Why choose steam juicing when you can just toss fruit in a blender or electric juicer? Well, there are a few great reasons.
First off, steam juicing is incredibly gentle. It doesn’t shred the fruit or oxidize the juice, which means you retain more of the fruit’s natural flavor, color, and aroma. There’s also less foaming and no need to strain pulp, which can make a huge difference when making clear juices for canning, jelly-making, or syrup production.
Secondly, a steam juicer is a one-pot wonder. You don’t have to stand over it and monitor every step. Once the water is boiling and the fruit is steaming, you can let it run for 45 minutes to an hour without interference. No pressing, no noise, and no complicated cleanup. Just pour, bottle, and enjoy.
Finally, if you’re into preserving, steam juicers are a dream. The juice is hot and pasteurized straight from the spout, making it ready to go directly into sterilized jars for long-term storage—no extra boiling or processing needed.
Additionally, if you’re planning to start your own juicing business, you can think about it as it will help you to process large quantity as well as preserver for long period.
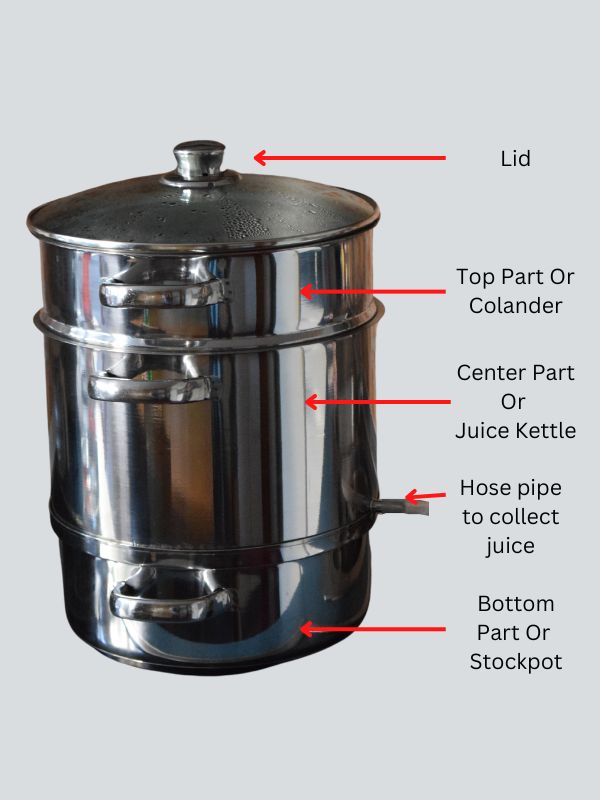
Components of a Steam Juicer
Base Pot (Water Reservoir)
The base pot is the heart of the steam juicer. It’s where the whole process begins. This section is usually the heaviest and sturdiest part of the setup because it holds the boiling water that creates the steam needed to extract juice.
You fill the base with about 2 to 3 quarts of water—enough to last through the entire steaming session without needing a refill. Some models have water level indicators or suggest adding marbles to listen for the boiling sound. If the water runs out during juicing, it can burn the pot or ruin the whole batch, so this part needs attention before you start.
Typically, the base pot is placed directly on the stovetop, whether it’s gas, electric, or induction (if your model supports it). Once heated, the water starts to boil and produces steam, which then rises into the middle section of the juicer and moves upward into the fruit basket.
Juice Kettle (Middle Section)
The juice kettle sits directly on top of the water reservoir. It’s a large bowl-shaped pot with a cone in the center that allows steam to rise into the fruit above. As the fruit releases juice, the liquid collects in this chamber.
This is where the magic happens: the juice drains from the fruit basket, flows down the cone, and gathers in the kettle. Most juice kettles have a spout or opening near the bottom that connects to a food-grade rubber hose with a clamp. This hose is used to drain the juice directly into bottles or jars once it’s ready.
What’s brilliant about this middle section is how well it keeps the juice hot and pasteurized. It’s the ideal temperature for bottling, which saves you an entire step if you’re into preserving juices or making jellies.
Steamer Basket (Top Section for Fruit)
At the very top of the setup is the steamer basket or colander. This is where you load your fruit—grapes, cherries, apples, berries, tomatoes, and more. The holes in the basket allow the steam to rise and surround the fruit while also letting the juice drain through into the juice kettle below.
You don’t need to peel, pit, or core most fruits before adding them to the basket. Just wash them thoroughly, remove any spoiled bits, and you’re good to go. You can even steam entire bunches of grapes or sliced apples with their skins and seeds. The steam does all the work, and any solids or pulp stay behind in the basket, leaving clear, clean juice below.
The steam softens and bursts the cells in the fruit, releasing juice in a slow, natural flow that captures the full flavor without bitterness or pulp overload.
Juice Hose and Clamp
This small but essential component connects to the juice kettle and controls the juice output. The hose is heat-resistant and typically food-grade silicone, designed to withstand high temperatures. The clamp controls the flow of juice from the kettle into your jars or bottles.
You open the clamp once you’re ready to bottle the juice, and close it again to let more juice collect. It’s an elegant solution that gives you control and reduces mess. A well-sealed hose also ensures the juice flows smoothly without splattering or leaking.
The Juicing Process Explained Step-by-Step
Step 1: Fill the Base with Water
Getting started with your steam juicer begins with one simple but crucial step—filling the bottom pot with water. This pot acts as the boiler and needs to generate enough steam to last throughout the entire juicing session. Typically, you’ll need to fill it with about 2 to 3 quarts of water, depending on the size of your juicer.
It’s important to ensure that you don’t overfill or underfill the base. Too little water and it may evaporate before juicing is complete, potentially damaging your pan or ruining the batch. Too much water, and it could boil over into the juice kettle, diluting your juice. Most people use a visual guide—like keeping water just below the vent holes—or place a marble in the pot to rattle when boiling begins, signaling when to monitor or refill.
Once the water is added, place the juicer on a stovetop burner and turn the heat to medium-high. Allow the water to reach a full boil before proceeding to the next step. This is the foundation of steam juicing—no water, no steam, no juice!
Step 2: Add Fruit to the Steamer Basket
While the water heats, prepare your fruit and fill the steamer basket. One of the best parts about steam juicing is its forgiving nature—there’s no need for perfect slicing or peeling. You can toss in whole grapes, halved plums, chopped apples (core and all), or even tomatoes with their skins.
However, it’s smart to remove stems, spoiled pieces, and any large seeds if they’re easily accessible. This helps keep the resulting juice pure and avoids bitter flavors. You can mix different fruits for custom blends—think grape-cherry, apple-raspberry, or even citrus-berry combos. The natural steam will blend their flavors beautifully.
Fill the basket generously but don’t overpack it. You want the steam to circulate freely and evenly reach every piece of fruit. Once the fruit is loaded and the water is boiling, stack the juicer components together, making sure they fit snugly.
Step 3: Heat and Steam Extraction Begins
As the steam rises from the boiling water, it travels through the central cone of the juice kettle and directly into the fruit basket. This steam heats the fruit from below, softening the skins and eventually rupturing the cell walls of the produce. As those cells burst, juice begins to flow out.
This part of the process usually takes about 45 minutes to 1 hour, depending on the type and ripeness of fruit. Softer fruits like berries and grapes may begin releasing juice within 10-15 minutes, while apples or pears may take a little longer.
You’ll notice the juice starting to trickle into the middle kettle, slowly collecting into a reservoir. Some people gently stir the fruit once or twice during the process to redistribute the pieces and help even out the steaming, but it’s not strictly necessary.
The best part? This entire stage is virtually hands-free. No constant stirring. No pressing. Just set your timer and let the steam do its work.
Step 4: Juice Collection and Bottling
When the juice kettle begins to fill, it’s time to collect the liquid gold. Attach a clean heat-resistant bottle or jar underneath the rubber hose, then carefully release the clamp to start the flow. The juice that comes out is already hot and pasteurized, meaning you can pour it directly into sterilized canning jars and seal them for long-term storage.
If you’re not bottling for storage, you can refrigerate the juice and drink it fresh. Just make sure it cools down completely before sealing it in a non-glass container to prevent pressure buildup.
Be sure to monitor the juice level in the kettle—if it fills too high without being drained, it can overflow or begin boiling, potentially affecting the clarity or flavor. Most steam juicers have enough space to hold up to several quarts of juice per batch, depending on how juicy your fruit is.
Once you’ve drained the juice, you can discard the leftover pulp or compost it. Some people even use it to make fruit leathers or homemade jam, so don’t toss it until you’ve considered the possibilities.
Types of Fruits Best for Steam Juicing
High-Yield Juicing Fruits
Not all fruits perform equally in a steam juicer. If you’re aiming for maximum juice output, your best bet is soft, watery fruits with high natural sugar and juice content. Grapes, apples, pears, plums, cherries, cranberries, and berries (like raspberries and blackberries) are some of the top picks.
Grapes, especially Concord and Niagara varieties, are classic steam juicing candidates. They yield a ton of sweet, richly colored juice that’s perfect for drinking, fermenting into wine, or turning into jelly. Apples and pears are excellent too, especially when mixed with tart fruits like cranberries or rhubarb.
Stone fruits like peaches and apricots also work well, although they may yield slightly thicker juice. You can slice them in half and remove pits for better flavor and consistency.
Combining Different Fruits for Flavor
Steam juicing also shines when it comes to blending flavors. Want to tone down the tartness of cranberries? Mix them with apples or grapes. Want a tropical twist? Add citrus slices or a bit of ginger root into the mix.
Combining different fruits allows you to create signature juice blends with depth and character. This is especially helpful for canners or home brewers who want a consistent, unique flavor profile in every batch.
Here are a few popular combinations:
- Apple + raspberry for a sweet-tart mix
- Grape + plum for a bold, purple juice
- Pear + cranberry for a fall-inspired blend
- Peach + cherry for a sunny, mellow drink
Just remember—different fruits release juice at different rates, so you may need to steam them a bit longer when mixing varieties.
What Not to Use in a Steam Juicer
While steam juicing is versatile, it’s not ideal for every type of produce. Bananas, avocados, melons, and most citrus fruits aren’t suited for this method. They’re either too low in juice, too mushy when steamed, or simply don’t release enough liquid to make it worth the time.
Citrus fruits like oranges or lemons are best juiced with manual or electric citrus presses. Their delicate oils and acids don’t do well under prolonged steam, which can alter their taste.
Avoid using fruits that are overly spoiled, moldy, or fermenting, as the heat won’t kill all the harmful bacteria and can affect the safety and flavor of the juice.
How Long Does It Take to Juice with a Steam Juicer?
On average, it takes 30 to 60 minutes depending on:
- Type of fruit
- Amount of produce
- Heat level
- Juicer size
Once the steam starts breaking down the fruit, juice will start flowing into your collection jar almost immediately.
Advantages of Using a Steam Juicer
Preserves Natural Flavor and Nutrients
One of the most compelling reasons to use a steam juicer is the quality of juice it produces. Unlike blenders or electric juicers that generate heat and oxidation, a steam juicer works gently and gradually, preserving the vibrant colors, aromas, and nutritional value of your fruit.
The juice comes out clear, concentrated, and smooth—without the pulp or foam that often comes from centrifugal or masticating juicers. If you’re someone who values clean juice with real fruit taste, the steam juicer delivers on every front.
Because the juice is extracted at a high enough temperature, it is also pasteurized during the process. That means you’re not just preserving flavor—you’re preserving shelf life, too.
Perfect for Canning and Long-Term Storage
If you’re into home canning, a steam juicer is practically a must-have. The hot juice it produces can be poured straight into sterilized jars and sealed immediately—no need to reheat or use a separate water bath for pasteurization.
This makes it a favorite tool for gardeners and homesteaders who harvest large quantities of fruit and want to preserve it efficiently. You can store your juice for months or even years, ready to use for drinks, syrups, jellies, or homemade wine.
Even better? Since there’s no added sugar or preservatives needed, your juice stays all-natural and customizable to your taste.
Less Mess, Less Effort
Compared to traditional juicers or blenders, a steam juicer is delightfully low-maintenance. No sharp blades to clean, no sticky pulp to scrape out, no filters to unclog. After the session, you simply rinse the components, wash out the pulp, and you’re done.
Because everything happens in one stacked unit, there’s minimal mess on your countertop. And since the juice is collected in a central pot and drained via hose, you avoid spills and drips that can stain surfaces or waste precious juice.
Tips for Getting the Most from Your Steam Juicer
Choosing the Right Juicer Size and Material
Steam juicers come in various sizes and materials, and choosing the right one can significantly affect your juicing results. For home use, a standard steam juicer with a capacity of 8–11 quarts is usually sufficient. However, if you harvest large quantities of fruit or do a lot of canning, you might want to invest in a larger unit.
When it comes to material, stainless steel is the top choice. It’s durable, non-reactive, and retains heat efficiently. Aluminum versions are more affordable and lighter, but they can react with acidic fruits, which may affect the flavor and safety of your juice. Some juicers also come with glass lids, which let you peek in without losing heat—an underrated convenience when you’re monitoring the process.
Look for features like sturdy handles, wide hose attachments, and easy-to-clean surfaces. Investing in a high-quality juicer pays off in time, quality, and longevity.
Prepping Fruit for Maximum Juice Output
Even though steam juicing is a low-effort method, a little fruit prep goes a long way. Start by thoroughly washing all your produce. Any dirt, pesticides, or debris left on the fruit can taint the flavor or cloud the juice. If you’re dealing with large fruits like apples or pears, cutting them into chunks will help them soften faster and release juice more efficiently.
While it’s generally okay to leave skins, seeds, and stems on, removing tough pits (like those in peaches or plums) can improve the final taste. For berries, simply rinsing and removing spoiled ones is enough.
You can also macerate firmer fruits—mix them with a bit of sugar and let them sit for a few hours to draw out their natural juices. This pre-softening step can enhance both the yield and flavor when they hit the steam.
Reusing the Leftover Pulp
One of the most satisfying things about steam juicing is that nothing goes to waste. After you’ve extracted all that delicious juice, you’re left with fruit pulp—and it’s far from garbage.
Here’s how you can repurpose it:
- Fruit Leather: Puree the pulp, sweeten if needed, and dry it in a dehydrator or oven for homemade fruit snacks.
- Jam or Jelly Base: Add sugar and pectin to the leftover pulp and simmer it into a spreadable preserve.
- Compost: If you’re not into reusing it in the kitchen, your garden will love it. Pulp breaks down quickly and adds nutrients to compost piles.
- Smoothie Booster: Some pulp still contains a bit of texture and nutrients—add it to your smoothie blends for extra fiber.
This eco-friendly approach means you get even more value out of every batch of fruit, reducing kitchen waste while increasing culinary options.
Common Mistakes to Avoid When Using a Steam Juicer
Letting the Water Run Dry
The number one mistake many first-time users make is forgetting to monitor the water in the base pot. Steam juicing typically takes 45–60 minutes, and during that time, the water can evaporate entirely—especially on high heat. If that happens, you risk burning the pan and ruining the batch.
Solution? Set a timer to check the water level halfway through the process. Some users even place a clean marble in the pot—it rattles as the water boils, and when the sound stops, it’s time to check.
Overpacking the Fruit Basket
While it’s tempting to load up the fruit basket as much as possible, overfilling can actually reduce efficiency. When fruits are packed too tightly, steam can’t circulate evenly, leading to uneven juicing or longer cook times.
Always leave some space for steam to move around. Stirring the fruit once midway (carefully!) can help distribute heat more uniformly.
Forgetting to Clamp the Hose
Steam juicers come with a hose for draining juice, and there’s a clamp that keeps the juice from flowing prematurely. If you forget to close it before steaming starts, hot juice may leak out before you’re ready—messy and wasteful.
Always double-check that the hose clamp is shut tight before you begin. Only open it when you’re ready to collect the juice into a jar or bottle.
Using the Wrong Type of Fruit
As we mentioned earlier, not all fruits are steam-juicer friendly. Avoid using soft, low-juice content fruits like bananas, avocados, or mangoes. These tend to break down into mush and won’t yield quality juice. Stick to high-water fruits for the best results.
Cleaning and Maintaining Your Steam Juicer
After-Use Cleaning Tips
Proper cleaning ensures your steam juicer lasts for years and produces consistently delicious juice. After each use:
- Disassemble the unit carefully—wait until it has cooled down completely before handling.
- Rinse out the juice kettle with warm water immediately to prevent sugar residues from sticking.
- Scrub the fruit basket to remove any pulp, seeds, or skins left behind. Soaking it in warm soapy water for 10–15 minutes helps loosen stubborn bits.
- Clean the hose by running hot water through it and letting it air dry. If the hose becomes stained or develops an odor, replace it with a food-safe silicone hose.
Avoid using abrasive cleaners or steel wool, especially on aluminum models, as they can scratch or damage the surface. A soft sponge or nylon brush works well for all parts.
Long-Term Storage
Before storing your steam juicer, make sure it’s 100% dry to avoid rust or mold growth. Store the unit in a dry place, preferably in its original box or stacked neatly with a cloth or paper towel between layers to prevent scratches.
If you use your steam juicer seasonally (like during harvest time), do a quick check-up before each new use—inspect the hose, check for rust spots, and make sure the lid and handles are still secure.
Steam Juicer vs Other Juicing Methods
Steam Juicer vs Blender
A blender purees fruit into a thick, fibrous drink, often with seeds and skins included. While that’s great for smoothies, it’s not ideal for juice purists or people who want clear, preservable liquid. Steam juicers produce clean, pulp-free juice that’s ready for bottling and storing—no straining needed.
Steam Juicer vs Centrifugal Juicer
Centrifugal juicers use spinning blades to shred fruits and separate juice via centrifugal force. While fast, they introduce air (oxidation) into the juice, which can reduce shelf life and change flavor. Steam juicers, on the other hand, preserve juice without oxidation and yield hot, sterilized liquid ready for storage.
Steam Juicer vs Masticating Juicer
Masticating (cold-press) juicers are known for high juice yield and minimal heat. However, they require manual feeding, regular cleaning, and can be expensive. They also produce raw juice, which needs pasteurization if you’re canning. Steam juicers do all this in one step, making them ideal for bulk processing and storage.
Conclusion
So, how does a steam juicer work? Simply put—it uses steam to gently extract clean, natural juice from fruits without the need for electricity, peeling, or complicated prep. It’s a reliable tool for anyone looking to preserve fresh produce, make jams, or enjoy homemade juice with minimal effort.
Whether you’re a beginner or a seasoned home canner, a steam juicer is a worthwhile investment that simplifies the entire juicing process.
Ready to get started? Pick up a stainless steel steam juicer and start transforming your fresh harvest into delicious homemade juices today!
FAQs: How Does a Steam Juicer Work?
Can I use a steam juicer on an induction stove?
Yes, as long as the juicer has a magnetic stainless steel base compatible with induction heat. Always check the manufacturer’s instructions.
Do I need to add sugar or preservatives to the juice?
No, steam juicing produces natural juice without the need for additives. However, you can add sugar afterward if you prefer a sweeter taste.
How long does the juice last after steam juicing?
When bottled properly in sterilized jars, steam-juiced fruit can last up to a year or more without refrigeration.
Can I steam juice vegetables?
It depends. Tomatoes and rhubarb work well. However, most vegetables don’t yield flavorful juice and may not be suitable for this method.
What should I do if the juice hose becomes clogged?
Pause the process, gently clean out the hose with warm water or a pipe cleaner, and resume juicing. Make sure to remove any fruit debris that may have entered.